The Woods Course
-
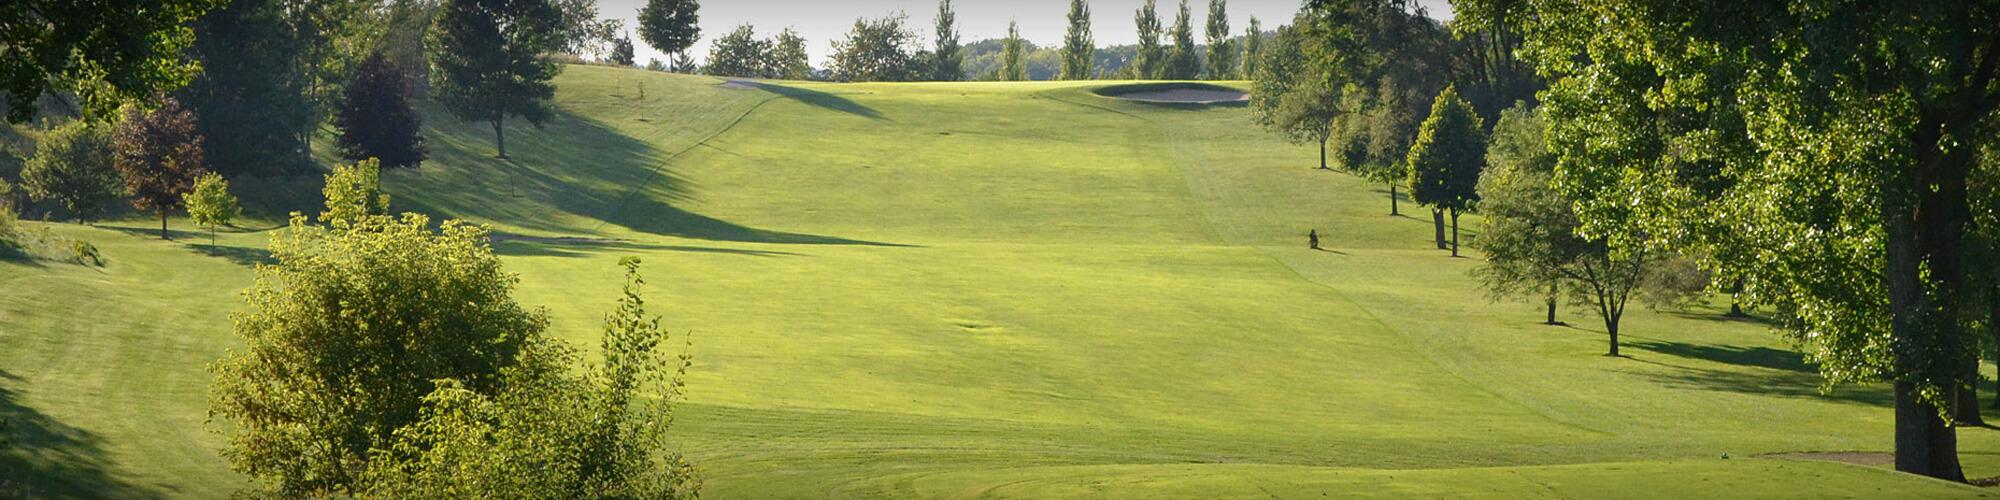
Hole #1
A downhill tee shot that should favor the left side of the fairway especially if you're hoping to hit the green in two. Subsequent approaches will be to a green only 23 yards deep and heavily guarded by bunkers on both sides. A miss left or long of the green will be penalized due to a severe slope. -
Hole #2
Pay close attention to pin location as club selection is key on this green that measures 34 yards in depth. A miss right is better (if you avoid the cart path) as the green slopes from back to front and left to right. The bunkers are a bit deceiving as there is more room to work with than your eyes can see. -
Hole #3
This dogleg right demands an accurate tee shot as bunkers are perfectly placed on both sides of the fairway. Try and cuddle those traps on the right to cut some yardage. Take an extra club as the second shot plays uphill to a green that’s 38 yards deep, which is about a three club swing depending on pin location. -
Hole #4
This blind fairway bends to the right with O.B. left so a perfect tee shot should hug the bunker, which should give you a nice downhill kick after the trap. It’s best to fly your approach shots to the pin rather than run the ball up as the green is protected by two bunkers and slopes considerably from back to front. -
Hole #5
The tee box is guarded by large Cottonwoods on the right and the fairway is defended by a hidden bunker on the left. Now’s the time to bring out the controlled slice for those righties! Your second shot will be uphill so go grab a longer club or two. A miss left (cart path alert) is better than long or right as there’s a severe slope and a trap awaiting an errant shot. -
Hole #6
Precision is crucial off the tee to ensure you’ll have a clear second shot to the green. A drive that rests just beyond the 150 maker would be ideal. Long hitters can attempt to clear the woods; tee it high and let it fly if you dare as length and control is a must. Your second shot is uphill and will require you to carry the ball to the green as a bunker sits in front. Please don’t forget to club up! -
Hole #7
This par 3 demands a great tee shot as it plays uphill and is framed by two bunkers. Add one more club before you tee it. The green typically plays firm so hit a higher shot that can clear the traps and allow you to stop the ball quickly. Low shots that clear the traps will usually collect behind the green. Miss long and left and you may find yourself in the trees. -
Hole #8
A gorgeous hole that commands an accurate tee shot. It’s best to find the fairway just short of the left bunker as the trees on the right come quickly into play. This strategy also ensures a flatter lie as its straight uphill after the trap. You guessed it, take an extra club. The green is 22 yards deep and is watched over by a bottomless, well placed bunker on the left. -
Hole #9
Welcome to arguably the hardest golf hole at Pleasant View. Hug the pines on the right as the fairway bends to the right but slopes left. A drive past the 150 marker will more than likely provide you with an awkward, downhill lie. The green is a bit shallow and slopes drastically from back to front. Avoid going long if at all possible as an up and down from behind the green is doubtful.
The Prairie Course
-
Hole #1
A nice scoring opportunity as this slight dogleg left par-5 can be reached in two. Drive down the left side if possibly to cut off some yardage. The green is relatively flat but rather large so club management is crucial on the approach as the infamous three putt awaits those that leave too much room in between their ball and the hole. -
Hole #2
This green slopes from back to front so attempt to leave your tee shot below the hole. Avoid going long and left as hard pan tends to kick the ball to less than desirable areas. The green is hefty so dial in your yardage before you pull the trigger. -
Hole #3
Left or Right? Just don’t find the bunker straight ahead as it tends to make your approach shots longer than planned. We recommend that shorter hitters stay right of the closest pond. Be aware of the greenside bunker and water right on your approach shots to this flat but tricky green. -
Hole #4
A well designed golf hole whose fairway is protected by a trap left and a forest of pines right that come into play quicker than most hope. The green, which has some good undulation, is quite narrow but has a depth of 33 yards. Try to keep the approach shots under the hole as it slopes mostly back to front. -
Hole #5
An uphill tee shot that’s nicely protected by two traps. The green is somewhat flat and is 34 yards deep so the yardage on the tee box will vary greatly depending on pin location. If you haven’t done so go back to your bag and get a longer club to accommodate the elevation change. -
Hole #6
A nice opportunity for a good score on this shorter par 4; long hitters can give the green a go! It’s best to keep your drive left to avoid the large valley running downhill to the right. The approach to the green will be tricky as your shot will more than likely be blind and uphill with a hidden bunker to go over. A miss long and left can find the hazard behind the green. -
Hole #7
Let’s bring out the controlled slice for righties and controlled hooks for lefties. This drive will test your distance control as too short won’t make the corner whereas too long will find trouble. The 150 maker on the map is a great indicator for your distance needed from the tee. Approach shots will be a bit uphill and stay clear of the slope that falls away from the green on the right. -
Hole #8
Historically one of the hardest greens on the course to hold. Too short of a drive and you won’t make it past the upslope; too long and you’re finding more issues than opportunities. Aim for the middle of the green, any misses should favor short and left to have the greatest chance for a par. -
Hole #9
Trouble is found to the right for the entire hole consisting of trees, traps and hazards. We’d say stay left on the drive but a bunker lingers therefore, the best position would be to simply split the fairway. Avoid the bunker lurking short and right of the green. The green is quite immense with a depth of 38 yards and plays more uphill than meets the eye.
The Lake Course
-
Hole #1
Enjoy the view but split the fairway. Uneven lies are common unless you’re a bomber off the tee. A shorter approach shot is made more difficult because this green is very shallow and slopes in many different directions. Attempt to land the ball just on the green if the pin is left as it slopes from front to back. -
Hole #2
The bunkers on the left haunt many so tee shots should stay short or right. Second and third shots will be uphill and constricted as two bunkers defend the layup area and a blind trap sits short and right of this extremely narrow green. A ridge does run across the middle of the green, but avoid going too long as your ball may never be found. -
Hole #3
Flirting with the big tree on the left of the fairway will provide you with a clear second shot to the green. The bunker on the right brings nothing but tree trouble and a greenside bunker on the approach. This rolling green is narrow and presents those that miss it with interesting chip shots. The green slopes more left to right, even though it may not seem so. -
Hole #4
Hit it straight here because trouble lies left and right. A miss short and right will give you the best chance for an up and down. A collection area does provide you some relief if you overshoot the green. Almost forgot…head back to the bag and change clubs for this uphill tee shot. -
Hole #5
You see that big pine tree straight ahead? Aim for that. Take note of the bunker positions on the map and notice the bailout area to the right if needed. Those a bit daring can try to fly the trap on the left, but water does linger if you go too far. The green is fairly undulating and slopes primarily from back to front. Hitting this green is a must as any misses will prove to be a difficult up and down. -
Hole #6
The 100 yard marker you see on the map to the right of this verbiage is a great reference point to gauge your yardage off the tee. Too short and you’re stymied by trees; too long and you’ll be working on punch shots. The pin can be difficult to get to when it is located in the front because the green slopes from front to back. -
Hole #7
A picturesque hole that is guarded by soaring oaks tends to cause trouble since the green is sloped heavily from back to front. It’s best to remain below the hole on this green that’s only 24 yards deep. Club selection is important because there’s more room between the crest of the hill and the green than you can see. -
Hole #8
Try to hug the right side of this fairway on the drive. Water comes into play rather quickly on the left with firm ground that funnels toward the H2O. The water on the right will annoy longer hitters with errant drives. The green is fairly deep and rather flat. Pay attention to the pin location to reduce the chances of a lengthy putt. -
Hole #9
Another great finishing hole that commands an accurate, long drive. In order to have a flat second shot, a drive past the 150 marker is needed. Long hitters should try and squeeze the left side of this doglegged fairway. The elevated green requires you to carry the ball all the way to the pin location so go get a longer club. A blind bunker does hang around long and right of the green.